Mast Hardware and Accessories
There are many types of accessories to use with a mast.
- pulleys and cross bars
- rotator sleeves and bushings
- antenna mounting brackets
- guy rope attachment
- anchor slings
- mast mounts, for use without guy ropes
Lets look at a few examples that may give ideas how you can make them with materials that you have available locally.
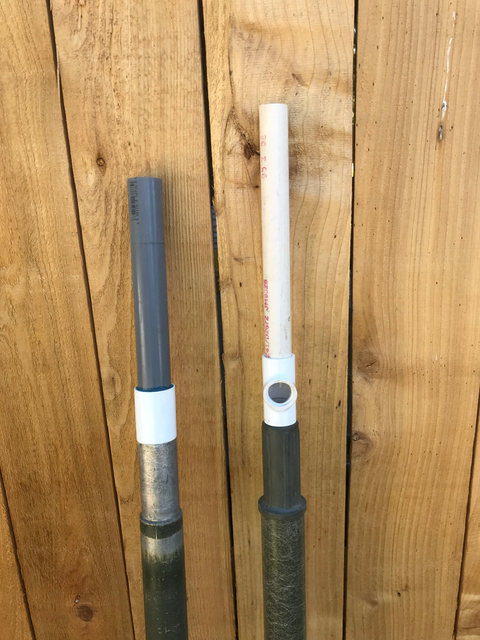
I have built many of these using plastic (PVC) water pipe, because it is commonly available, along with a wide range of fittings. Because my antennas are often made with PVC pipe, I have chosen a particular size as my “standard antenna mount”.
I also discovered that the heavy duty military aluminum 1.2m (4 ft) mast sections are a slip fit on the inside for nominal 1 inch PVC pipe, and the fiberglass ones take 3/4 inch pipe. Other mast types, however, need different approaches.
pulleys and cross bars
I almost always use a halyard (a rope loop through a pulley with the two ends tied together) when I put up a mast for wire antennas, as it allows me to lower the antenna for maintenance, adjustment, or experimentation without lowering the mast. This is particularly important when the mast is supporting multiple antennas, such as a 2m ground plane and an HF dipole, when one antenna may be in use while the other is being assembled. This requires some sort of a pulley at the top of the mast.
Actually, while I have some pulleys, I usually use screw eyes or eye bolts instead. Or, to avoid having to pass the end of a rope through the hole, I use a clip or carabiner around the rope that connect is connected to the mast. This avoids the worry about ropes of the wrong diameter slipping beside the pulley wheel and getting jammed. This doesn’t have to be designed for alpine use: a 5 cm ( 2 inch ) aluminum clip should be sufficient, or a single link of chain tied on a rope. The important thing is that the inside be smooth so the rope doesn’t catch.
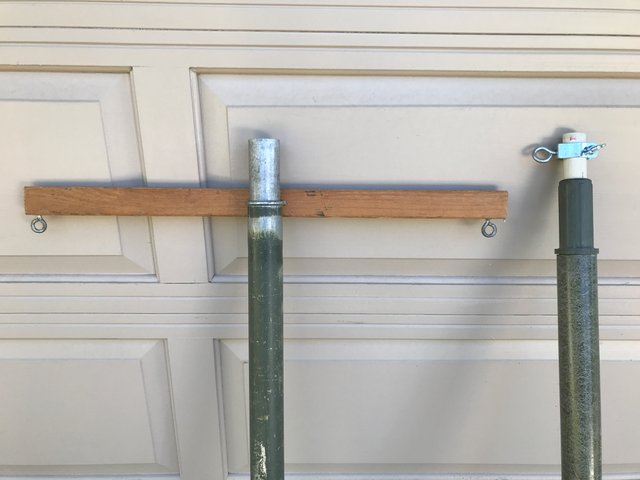
And with heavier masts I may hang two different wire antennas, in which case I use some sort of horizontal cross bar or spreader with a pulley or screw eye at each end to provide some separation between the antennas and the mast. A piece of wood, plastic pipe, or steel angle iron is usually convenient, depending on the mast I am using. Generally 1m (3 ft) is long enough for most purposes, depending on the mast / tower it is being used with. Mine are often somewhat less than that.
rotator sleeves and bushings
These will vary widely, of course, depending on the type of antenna being mounted.
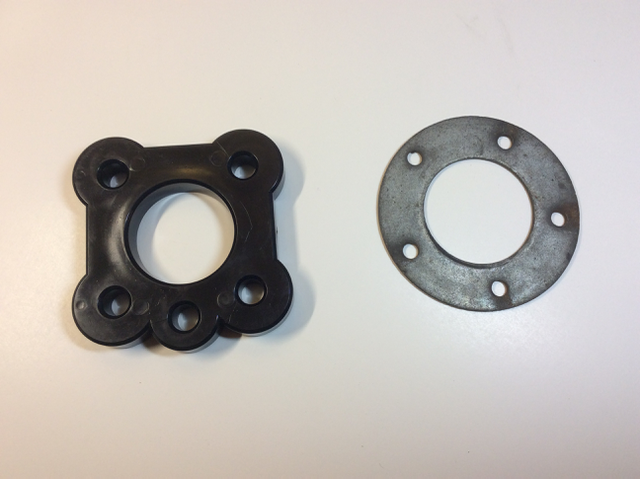
For rotatable beams, I generally use a bushing of plastic pipe that slips in the end of the mast, with a coupler glued in the center that keeps it from going in too far that also is the bearing surface. The antenna is clamped to the top section of this bushing, then the bottom end is slipped into the top of mast. For this I often use the thickest available pipe and fixtures for strength. Be sure to check your mast sections to see which ones work best: some of mine are dented or slightly out of round, and the pipes don’t fit inside, or don’t rotate freely. Choose a good section for the top of the mast before you put the mast up!
A rope tied to one end of the boom permits rotation from the ground (sometimes known as an “Armstrong Rotator”, because it takes strong arms), and the antenna can be tied off in any desired direction.
When the mast is too thin for the bushing to slip inside it, the same effect can be achieved by using a larger size of pipe that slips over the outside of the mast, with an end cap glued on the top of the pipe that bears against the end of the mast. If the end of the mast is too rough, a wooden plug can be used in the top, sanded down to provide a smoother surface, with some candle wax rubbed onto it for lubrication.
In either case, when a mast is used with a rotatable beam, it should generally be guyed as close to the bottom of the antenna as possible, unless it is designed to handle the wind load of the antenna free-standing. Because there is a lot of leverage at the base of a mast, especially with wind loading, many portable antenna mounts may not be suitable for this type of use without guying (or the mast may break instead).
antenna mounting brackets
Fixed antennas, such as VHF/UHF verticals, should be mounted in line with the mast when possible, rather than offset with a side mount bracket, to help reducing bending of lighter masts. Some such antennas have the feedpoint connector inside the bottom sleeve of the antenna. I solved this problem for my ground plane antennas by using the same sort of bushing as for rotating antennas, but using a 3-way “T” connector instead of a straight splice. This permits the coax to run down inside the pipe that mounts the antenna, and out through the side hole in the T, while the bottom slips inside the mast. This is easier than trying to run the coax all the way down inside the mast, especially with the way I put up sectional masts.
guy rope attachment
I generally just tie the guy ropes to my masts, but many hams prefer to use guy rings or other fittings to do so. In some cases, this can permit the whole mast to be rotated while the guys remain fixed.
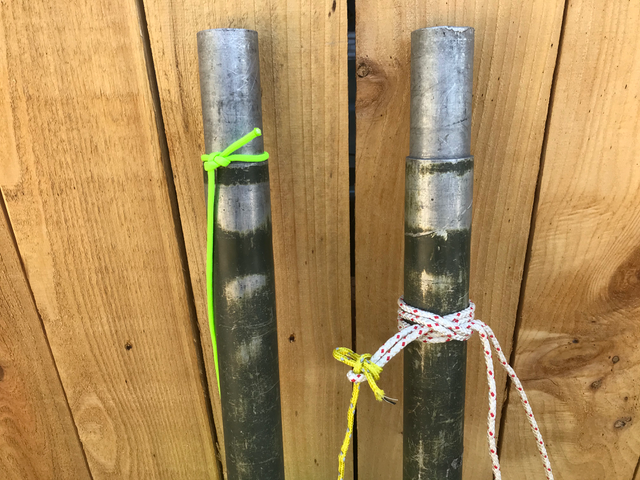
The following photo shows two ways of tying the guy ropes to the mast: on the left, for dedicated guy ropes, I tie a loop in the end that is just large enough to fit over the top of the joint, but not over the main part of the mast. This requires several tries to get the size just right. On the right, the middle of a longer rope (red and white) is tied to the mast with a clove hitch, with the third guy (yellow) tied to the resulting loop.
anchor slings
Sometimes it isn’t convenient to tie a guy rope around an anchor and still be able to adjust it. This might be because the rope won’t slide easily, the anchor is difficult to reach, or to protect the bark of a tree from damage by spreading the force over a larger area. To solve these problems, I often use anchor slings: lengths of webbing tied in a loop, with some sort of ring or carabiner for the guy rope to attach to. In one case, we had several large round rocks about 1 m (3 ft) diameter as anchors, and the rope would tend to jam under the rock when we tried to adjust them. We put a fixed sling of webbing around the rock, then tied the guy rope to that. This has also been handy when tying to the base of a dense, bushy shrub, to bring the adjustment point out to a more convenient position. Flat webbing tends to cause less damage to tree bark than round rope, but rope will also work. On occasion I have used a dog leash for this purpose.
mast mounts
Sometimes it isn’t practical, or desirable, to use guy ropes to hold up a mast. This may not be a problem for a permanent installation, but short-term portable operation may require something simple and quick. The easiest approach, of course, often is to secure the mast to a sign post, fence, or other existing object using bungee cords, rope, straps, tie wraps, or duct tape. Other times I have simply leaned the mast against the side of a building or tree.
Various types of tripods are commonly used to hold portable masts. A tall mast (especially with any sort of wind loading on top, like a VHF beam) can generate a lot of leverage, so the tripod may require extra weights and/or extensions on the legs to keep it from falling over. Those designed for cameras may be too light, while those for mounting speakers or other large items have been used. I have some of the tripods designed for roof mounting of TV antennas, and these often will require that the feet be bolted to longer horizontal boards for masts more than about 6 m (20 ft) high, depending on conditions.
Another common portable approach is a “drive-on mount”, where one tire of a vehicle is used to hold a mount in place. The mount can have a piece of pipe that fits inside the mast or around the outside, or a vertical leg that the mast can be attached to using bungee cords or straps. Again, there can be a lot of force at the base, depending on the height and loading of the mast, and the mount (and the mast) must be able to withstand this.
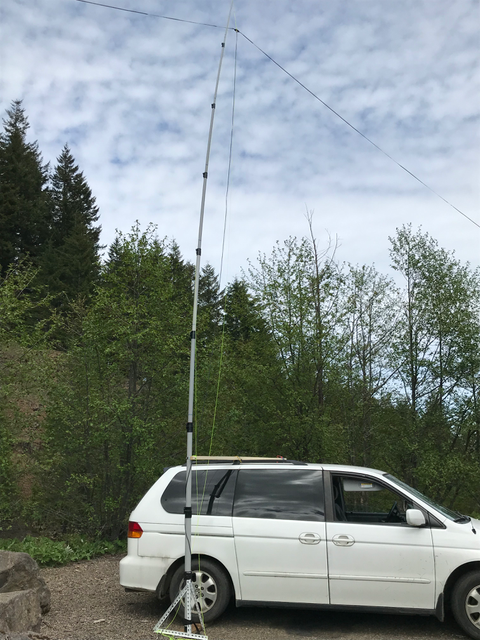
Drive-on mount supporting mast and dipole. In this case, I used an extra brace on top of the car. 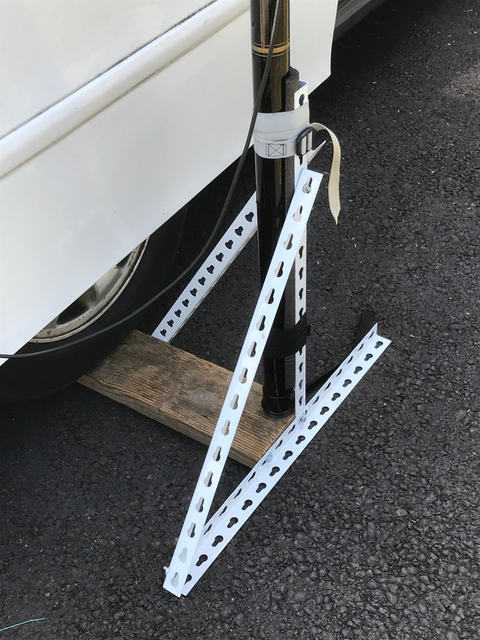
Detail of drive-on mount with cross-bracing. 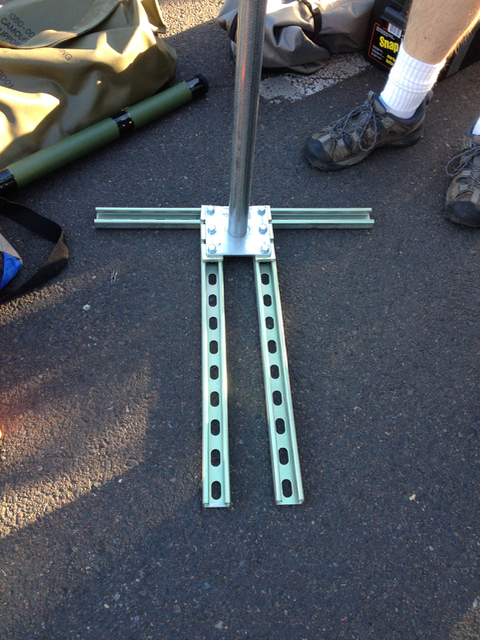
Drive-on mount made by KU7PDX using standard parts.
Perhaps the simplest drive-on mount uses a “floor flange” mounted to a piece of wood, with a length of pipe screwed into it. The pipe should be sized to slip inside or outside of the mast you plan to use it with. Again, the stresses on the mount can be high if the mast is free-standing, and using bolts through the board with washers on the back side would be stronger than standard wood screws.
