Winding Rope and Wire so they don’t tangle
Few things take the fun out of portable operation more than getting to your destination and having to spend your time untangling your antennas instead of making contacts. On one occasion, I spent so long untangling a rope that I got sunburned.
I didn’t invent the technique I’m going to describe here. It is a combination of approaches that I learned surveying in the mountains of California, winding punch tapes for an old computer, and on a sailboat off the coast of Maine. But I use it, or at least the underlying principle, to winding just about everything: ropes, wires, power cords, garden hoses, etc. And it isn’t that different from how folks often wind up ropes, but there is a small change that makes a big difference. It makes quick antenna setup and take-down much more practical and enjoyable.
I am more fanatical about this one aspect of portable operation than anything else. (See prior reference to sunburn.) When we have a large Field Day event, I bring out a big box of pieces of rope wound in this way. We may use 400m (1/4 mile) of rope, and 200m (600 ft) of wire, but I make sure that every piece is wound properly before it is put away afterwards. If someone was being “helpful” and wound it differently, I rewind it properly.
I use this method because I find it has the following advantages:
- saves time
- costs nothing
- minimizes tangles
- no extra hardware or equipment needed
- does not twist the rope
- I can attach one end of the rope or wire without needing to untie the whole bundle
How long does it take to wind up a rope? I just timed myself: I wound up a 30 m (100 ft) rope in 42 seconds. (It takes longer, of course, when a cat is chasing the rope.) Now, I do have ~50 years of regular practice in doing so, so you might not be as fast to start with. But the best part is that I can then take that bundle of rope, stick it in my pocket, and pull the entire length out from one end without tangling.
Underlying Principles – the science of winding rope
There are two underlying principles to why this approach works better than many others I have tried:
- it doesn’t cause the rope to twist
- it maintains the order of turns / layers in which the rope was wound
Many common ways of winding rope will twist it in the process. This is easiest to see if you use a flat strip of paper, ribbon, or webbing instead of a round rope. When rope gets twisted, it tends to curl up on itself and make more loops, that then catch on each other to make tangles. Winding a rope onto a reel by turning the reel doesn’t do this, but holding the reel still and winding the rope around with your hand does. One of the things we want to do is to minimize twisting the rope.
Another cause of tangles is when multiple loops of rope get intertwined, and one tightens around another when the rope is pulled out. (I learned a lot about the mechanics of tangles that day I got sunburned.) When winding rope on a form, the first inner layers are smaller, and don’t encircle the outer layers. And if each layer crosses the one below it at some point, rather than just wrapping around it, then it is less likely that they will catch when pulled.
Note that the method I use with my rope throwing bucket, where I feed the rope into the bucket and let it fall as it may, also satisfies these two principles. That is optimized for quick payout of the rope, and doesn’t store as well between trips.
winding method
We can avoid twisting the rope if we wind it in a figure-of-8, because the half twist from the first part is cancelled out by that of the second part going the other direction. In addition, every turn crosses in the center, so it helps to maintain the ordered layering. Here is an example:
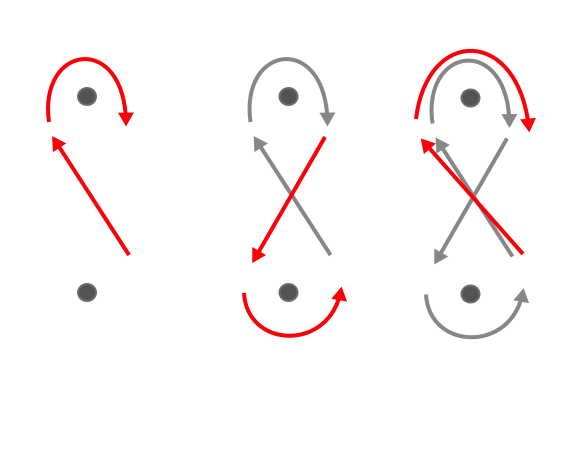
For shorter ropes, I wind this between my thumb and little finger, across the palm of my hand. (I can use the base of my thumb to hold the end of the rope as I get started.) That’s how I wound the 30 m (100 ft) rope that I timed. For longer or bulkier ropes, I wind between my hand and my elbow, otherwise using the same method. For large climbing ropes, I sit down on the ground at stick my knees out as far as possible and wind around them. But what is important is that every turn crosses over the center, so when I wrap around the ends the rope goes the same direction (right-to-left, for example).
A common problem is not keeping your hand (or arm or knees) spread as wide as possible while you are winding. It helps not to pull the rope too tight in the process. Beginners often end up with their thumb and little finger almost parallel to each other from fighting the pull as the rope is wound. Relax the tension on the rope, but don’t relax the spread of your hand.
As you get used to the process, you will find that both hands play a part in the process. The hand holding the rope will move back and forth while the hand on which it is being wound will rotate to align with the direction of the next turn. Don’t think about this too hard – let it happen as you get the feel of winding.
Something like this:
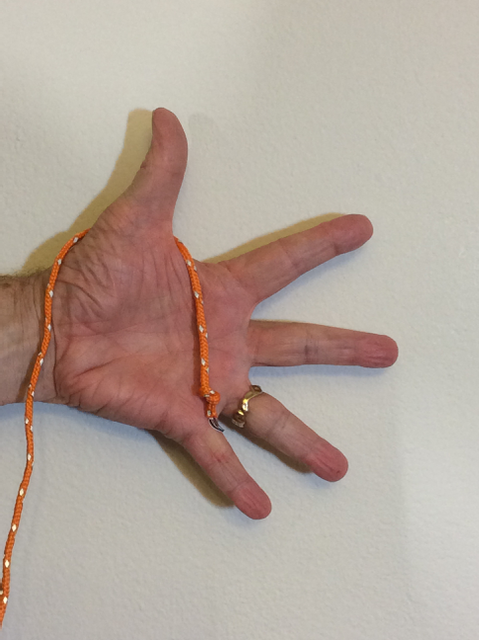
Start of winding. The end of the rope might be more towards the middle of my hand. 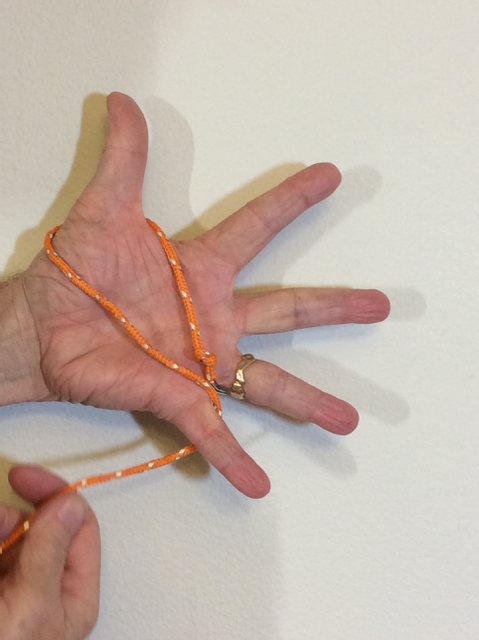
Every turn goes diagonally across my palm… 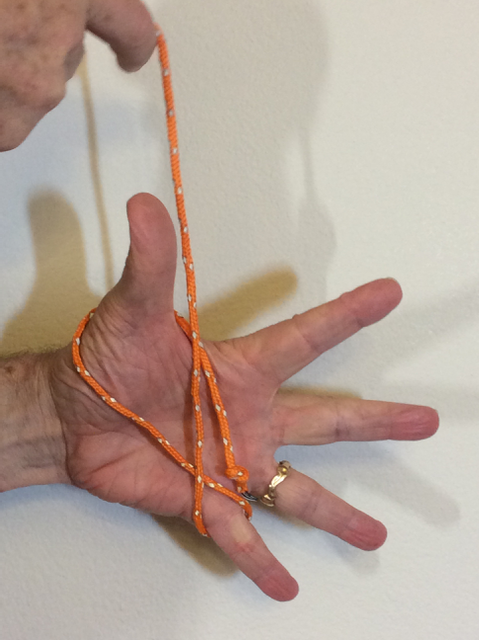
Always crossing in the center (even if it isn’t exactly in the middle). 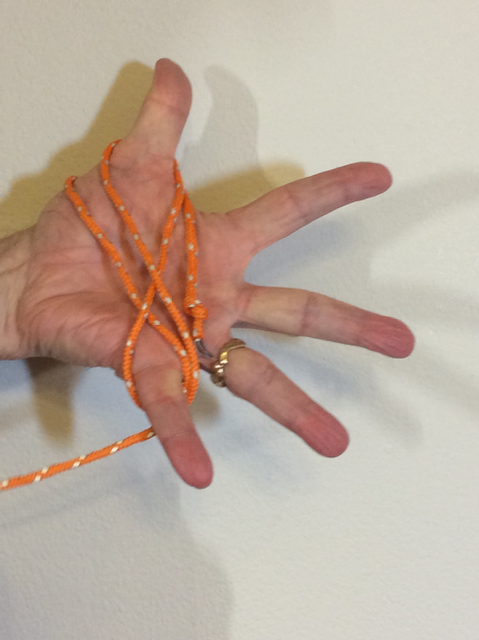
The rope always wraps towards me when passing around either the thumb or finger. Keep your hand spread and don’t pull too tight on the rope. 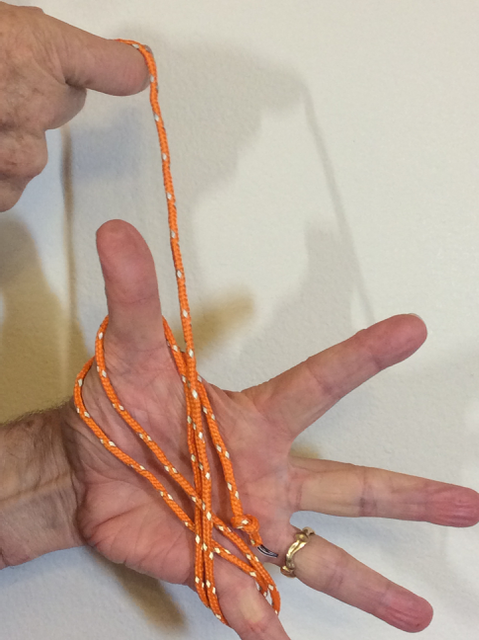
Here it is easier to see how every turn crosses the one below it. 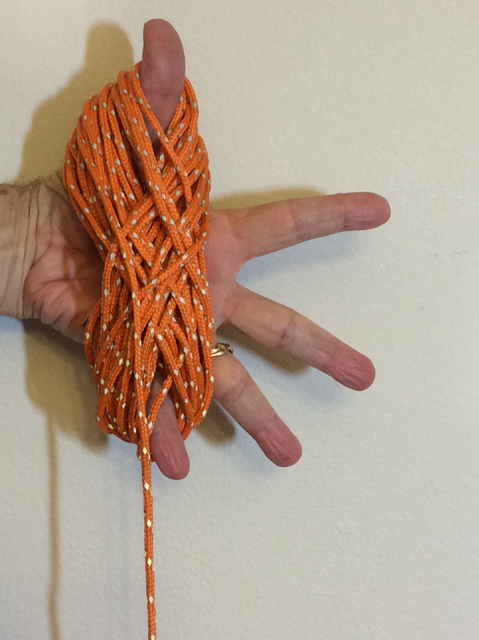
And just keep winding until there is a short “tail” left.
finishing the winding
When you get near the end of the rope, leave yourself a bit of length to work with (you will have to see what works best for your particular length and type of rope). Take the rope off your hand, while keeping your thumb or one finger through the hole in the winding where your thumb was. With the other hand, grab the unwound rope and wrap it snugly 3 to 5 times around the center of the winding to hold it together.
Then double the rope over itself (“make a bight” in knot tying terms) and pass the folded end through the hole where your thumb was. Open the folded end and pass the resulting loop around the end of the rope bundle, then pull on the free end to tighten it.
Once the rope is wound on your hand… 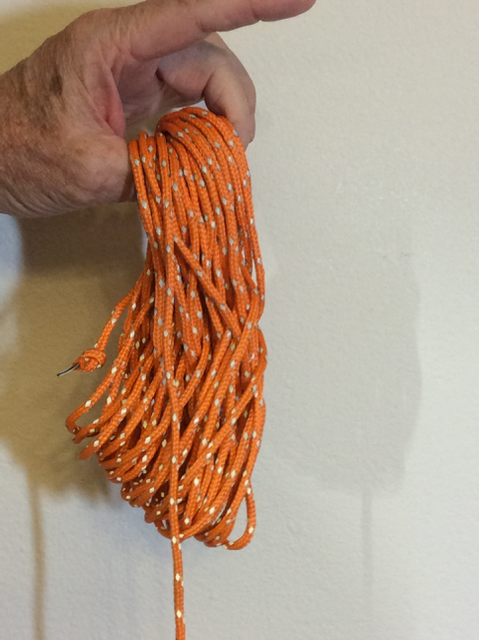
Remove your hand, keeping a finger through the spot where your thumb was. 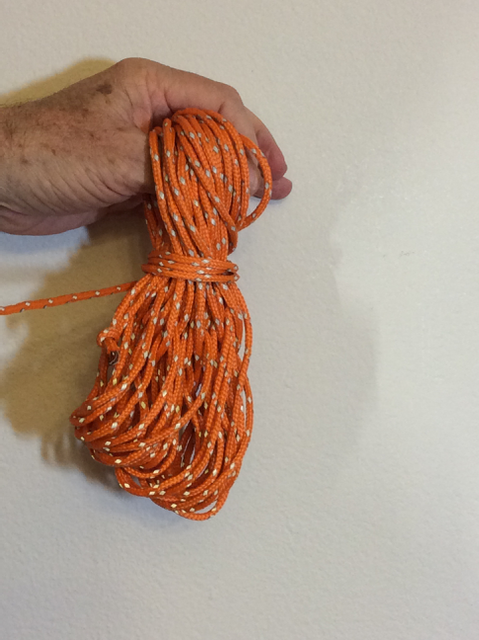
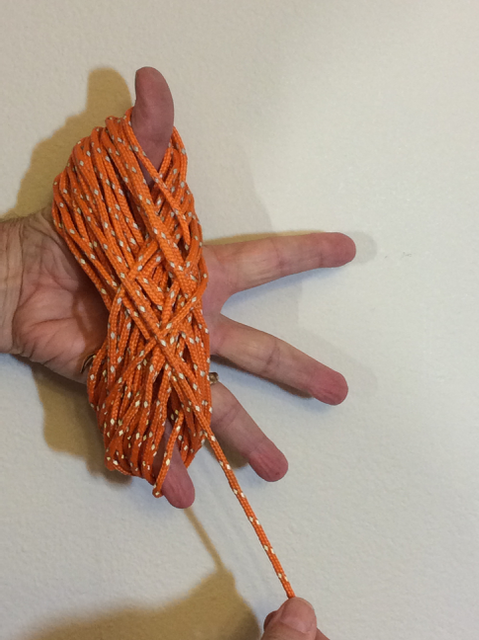
Wrap the remainder of the rope 3 to 5 ties around the bundle. 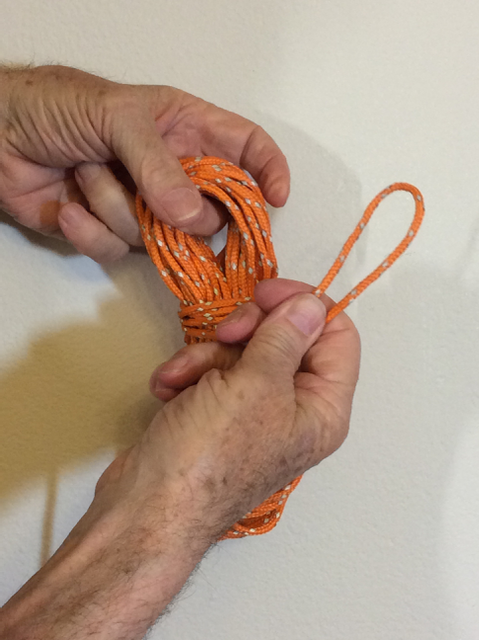
Fold a bight in the remainder 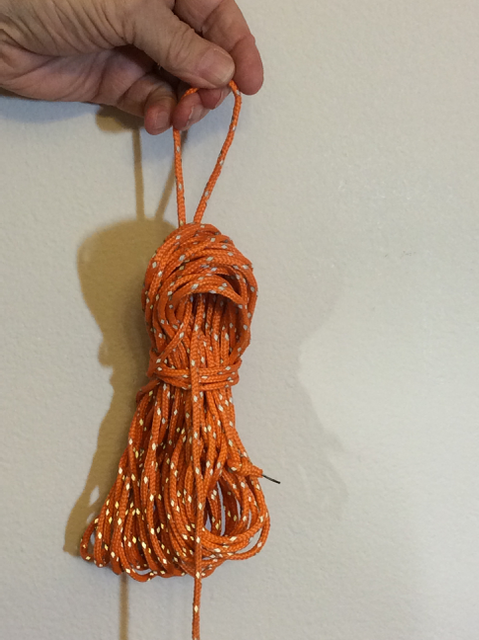
Pass just the bight through the open hole (not the end of the rope) 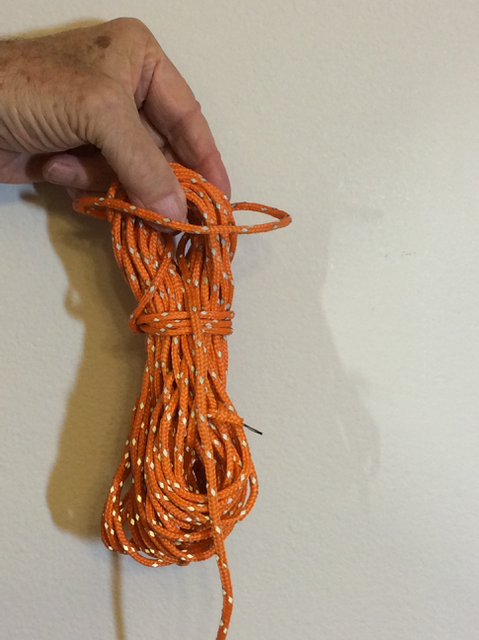
Fold the bight loop over the bundle 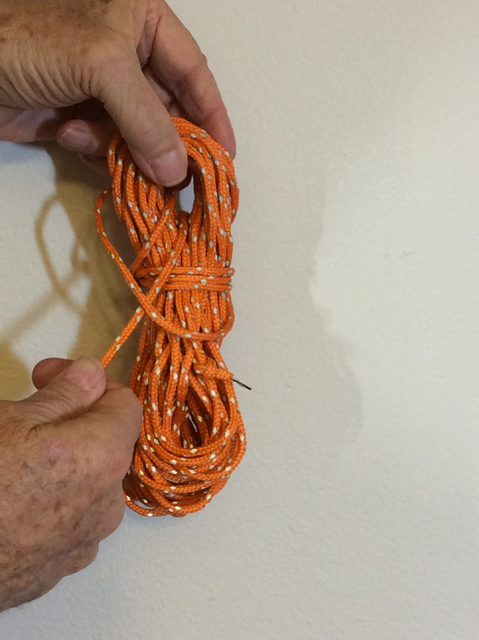
And pull it tight. 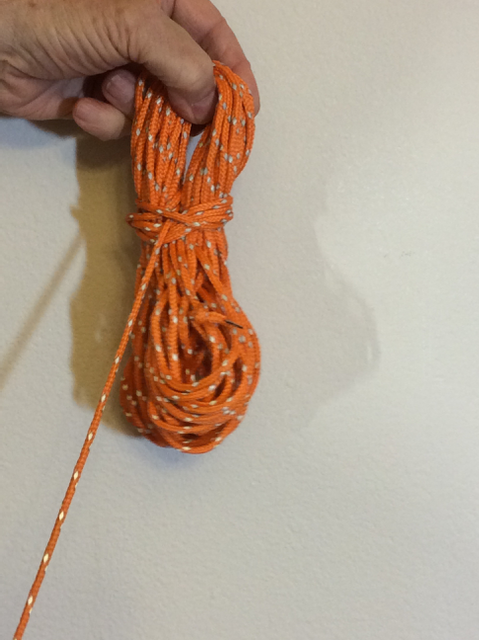
The resulting bundle is easy to undo, even years later.
Because you never actually passed the end of the rope (just a fold in the rope) through the bundle, you can tie or untie it while one or both ends are attached to other objects. I find this is handy for attaching a dipole wire to the center insulator, for example, without needing to have a pile of wire on the ground. I also use it for winding up the free end of a rope after I have tied off an antenna. You can undo the last couple of steps and let some wire out of the bundle, then tie it back up again.
When you go to unwind it, undo the last two steps. If you look for the initial end of the rope (where you started winding), then it should pull cleanly out of the bundle. (That’s the secret if you want to show off by pulling the rope out of your pocket). Often I’ll just drop the bundle on the ground at that point as I drag the rope to wherever I need it. If you take the rope off the other end it might need a little help by wiggling the bundle back and forth, depending on how well you wound it.
You will notice that all the ropes and wires in my backpack dipole kit are wound this way.
other winding forms
You can use the figure-of-8 technique when winding rope or wire onto a framework or holder to reduce twisting, although it may not be possible to take the rope off the framework when you are done. I have found some plastic forms for winding extension (AC power) cords that work well, and I have made wooden frames (light wood nailed in a rectangle with the ends sticking out) that can wind two dipole elements up-and-down on one side, and another pair left-to-right on the back, using all 8 board ends. But that takes up more space, and isn’t as easy to unwind as the small bundles I do on my fingers.