Antennas for Backpacking
last updated 25 March 2025.
Discussion
Backpacking places some of the most stringent limits on antennas, particularly for weight, if one is going to carry it (and the associated station equipment) for many km (miles) over several days. It also generally means QRP operation, so performance is important, and accessory equipment (like antenna tuners) and supports (if carried) also need to be chosen carefully. At the same time, access to back up options and repair capabilities will be limited to what you carry with you, so versatility and reliability are important.
Note that this section is primarily about antennas that are carried in the backpack and set up portable when in camp. Antennas to be used while in motion (other than for VHF/UHF) are more difficult – especially on trails with overhanging trees.
For backpacking, it usually comes down to a trade-off among:
- weight – how much you are willing to carry.
- performance – needs to be “good enough”.
- adaptability – can you set it up in different situations?
- size: not as important as weight, except for mast section length.
- the availability of local supports, of if you need to bring your own.
This trade-off is a personal choice, and may vary depending on the purpose of the trip, the distance to be covered, etc. There isn’t any “one size fits all” solution. Instead there are several options, all of which will likely produce some contacts.
The relative performance of various antenna types is the same as for any other operation, and different hams have their own favorites. Let me describe my portable antenna kit, and most importantly, some of the factors that lead me to make the choices I did. I certainly am not saying this is the “best” option for others, because they may have different preferences, conditions, and operating requirements, but this serves as an example of how those requirements can shape your antenna choice.
Example Analysis
Years ago I had an opportunity to travel with a QRP HF rig, and needed a suitable antenna system. My requirements at the time were:
- Covered all 5 pre-WARC HF bands (80m, 40m, 20m, 15m, and 10m)
- Capable of covering both ends of the 80m / 75m band (3.5 – 4 MHz).
- Permits changing bands without modifying the antenna.
- Did not need an antenna tuner.
- My operating interests were more rag chewing and meeting the locals rather than DXing.
- Reasonably efficient, for use at 2 – 3 watts.
- Reasonably light weight for backpacking.
- Reasonably small for international flights and baggage.
- Low cost.
- Adaptable to a wide variety of situations.
The choice of bands was because, at the time, all the bands my radios could operate on were open at some time of the day. I don’t know that I thought much about band changing at the time, but having spent 24 hours at a time on a couple occasions holed up in the tent in a howling rainstorm, I was very happy that I could change bands without going outside!
The interest in relatively local contacts, especially on 40m, as well as efficiency, light weight, and not needing to carry a tuner (this was before the days of built-in autotuners) suggested full sized wire dipoles, which also met the criteria for low cost. For weight and space reasons, I would use local supports (generally trees) rather than carrying a mast.
My first dipole kit had used 0.6mm (AWG #22) solid magnet wire wound on a cardboard tube, with thin speaker cable for feedline. The solid wire was difficult to use because it was prone to kinking, and the feedline didn’t give a good match to my rig due to the characteristic impedance. So for the next version I switched to stranded, insulated wire, and RG-174 coax cable (50 ohms). Looking at the coax loss table, in 8m ( 25 feet ) I would loose 1/4 of my power on 10m (1.2 dB line loss), but that was considered acceptable for the increase in antenna height that it would allow. Losses are lower on other bands.
The result was that, once I tuned up the dipoles for minimum SWR in a local park, I just strung them up and used them with no adjustments in the field. That’s not to say that the SWR was always 1 : 1, but it was low enough that my rig worked effectively. That also made setup much faster, as I didn’t have to spend any time adjusting or tuning the wires. (The only step that took extra time was choosing what wires to put on – that would have been a bit faster if I had had enough different colors of wire available to color code the wires for each band.)
Hmmm… what about that requirement to cover both 80m and 75m? I had to make a compromise. I decided that 80m generally wouldn’t be open at the same time of day as 10m or 15m, so I cut the 80m wires short and added the 15m wires on the ends for the low end of the band and the 10m wires for the high end. In practice, I have left the 15m wires attached and operated 15m using the 40m wires. Since then I have developed a way to tune the 80m element across the band by folding back the wires, so I might do it differently next time.
Adaptability is more difficult to quantify. I created a center insulator with bolts and thumb nuts that was permanently connected to the coax, with separate dipole wires for each band that could be added in any combination each time I set it up. Some trips I only used 40m, and other times I put up wires for all 5 bands at the same time. When time or space were limited, such as a lunch stop, I could put up just one band without needing the full width of the 80m element.
The center insulator is a slice of rubber radiator hose, and the wires (and coax) tie through the hole for strain relief before connecting the ends. Over the years, this kit has travelled nearly half way around the world (VK6 to VE1, with some other stops including KH6 and KL7 along the way) with no wire breakage.
But, looking back, this approach had other advantages, especially since I like to experiment with antennas. Not only have I erected the antennas in a number of “non-ideal” situations (hanging from rocks, propped up on a stick, running along a barbed wire fence [no, that didn’t work well] or laying on a low hedge, etc.), but I have also used wires for different purposes. For example, one of the 40m dipole wires makes a full wave loop for 10m (with the addition of one cliplead for SSB or two for CW). I could use one wire as a quarter wave vertical and assorted others for radials. Perhaps one of the more creative applications was when I used the 20m wires as a doublet and tied the 40m and 80m wires together as a parallel feedline – this and enough rope permitted me to string the antenna between two rocks on the remnants of an old volcano shell with the center 100m ( 300 feet ) above the ground below it. (I did use a small balanced tuner in that case.) And the kit is easily extended to other bands by the addition of other wires.
What would I do differently? If I was only planning to use one band, then I could use a half wave of speaker cable to save cost (though the losses would not be any lower than with the RG-174 coax), or use a full wave loop instead. If I am going out for Field Day, or other occasion where performance may be more important, then I might use 300 ohm twinlead with a doublet and take a tuner (and possibly more rope to get the antenna up higher). With taller trees, I might carry a feedline extension, or plan to put up my 15m J-pole. If there aren’t any trees, then I’ll carry some sort of mast with me. For minimum total wire required I might choose a link dipole, or Off-Center-Fed Dipole (OCFD). If I want gain in a specific direction, then I’ve used a long wire with a tuner, or even a vee beam. If I was going to be operating around salt water, or high conductivity soils, I’d give more thought to vertical polarization. For extreme light weight, I might use a miniature L-network tuner with an end-fed half-wave wire (or longer, depending on how I could arrange it with the expected supports).
So there were a number of factors that led me in this particular direction. In other cases, I might have chosen something else. The point is to make that decision a conscious process based on your particular operating interests and situation, rather than blindly picking something that is advertised as suitable for portable operation, or what someone else is using, and assuming it is optimum for your needs.
Making Trade-offs
The main tradeoffs are regarding feedline, insulators, connectors, and supports. For example, my backpack dipoles don’t have baluns, especially not those wound on 5cm (2 inch) ferrite cores. The added weight, and the chance of breaking a core due to rough handling, is not worth the possible side effects (although I try to choose the feedline lengths thoughtfully). For end insulators, simply tying the support ropes to the ends of the wires is quite adequate (even at 100W).
Wire Size
Small wire doesn’t add much loss, at least for a full-size half wave dipole. I haven’t broken a wire yet, even using as small as 0.4mm (AWG #26), as long as it is stranded wire with plastic insulation. Solid wire is much more prone to kinking, which can cause it to break, while stranded wire can be tied in knots like rope, and easily wound up. The plastic insulation adds a lot of strength without much extra weight. It also is important to provide strain relief for the wires (and feedline), to avoid putting any mechanical stress on the electrical connections (particularly if they are soldered).
Wire weight varies with the square of the diameter, so a wire twice the diameter will have 4 times the weight. Some common American wire sizes with the corresponding weights per unit length (based on insulated wire sizes I found in my junkbox):
| AWG gauge | diameter (mm) | grams per m | ounces per foot |
| # 16 | 1.3 | 10.1 | 0.12 |
| # 20 | 0.8 | 5.5 | 0.06 |
| # 24 | 0.5 | 2.4 | 0.026 |
| # 26 | 0.4 | 2.17 | 0.024 |
So assuming 20m ( 66 feet ) of wire for a 40m dipole, the weight would vary from about 200 g ( 8 ounces ) for the largest size (which is about as large as I would use for any portable antenna) down to 43 g ( 1.6 ounces ) for the smallest. In terms of performance, the 1.3mm (AWG #16) wire is about 97.5% efficient, while the smallest 0.4mm (AWG #26) wire is about 92% efficient, for a total loss of 0.35 dB due to the wire resistance.
Feedlines
Feedline choice is a common matter of discussion, with some popular options:
- RG-174, RG-316 or other small coax (2.5mm, or 0.1 inch diameter)
- Speaker cable or other 2-conductor cable intended for other uses
- 300 ohm twinlead, or other light open wire line
- Reducing the feedline length to a bare minimum to reduce losses, even plugging the antenna wire directly into the transmitter.
I have used all of these, and while my personal preference is the first one, any of them can work well if properly designed. For comparison, common 2 x 0.8mm (AWG #20) speaker wire (selected at random from my junkbox) weighs about 15 grams / meter (0.16 ounces / foot ), about the same as 50 ohm RG-174 coax, but the losses are slightly higher with the speaker cable, especially if operated at a high SWR. It is possible to lose 3 dB on 20m in such as cable when feeding a 50 ohm antenna. For a multi-band antenna kit, it is much easier to match dipoles using the 50 coax rather than the higher impedance (about 135 ohms) of the speaker cable. (The coax is also less affected if it gets wet, lays on the ground, or gets stepped into the mud.) Foam dielectric cables give lighter weight and lower loss, but can be more prone to damage from being stepped on.
The feedline data tables include data on weight and typical losses for many types, including speaker cable and “zip cord” (AC power cord) that are not normally intended for RF use. This permits assessing the trade-offs between weight and loss. Additional discussion, including plots of loss vs. frequency, are included in adventures with small feedlines.
In practice, a 8m ( 25 foot ) length of RG-174 coax weights 120g ( 4 ounces ) and has proven a reasonable compromise between weight, losses, and antenna height. In the field, typical antenna heights are often in the 4 – 6m (15 to 20 foot) range. I sometimes carry a feedline extension for more flexibility. The total weight of a 40m dipole (feedline and wire) would be about 163 grams ( 5.6 ounces ) when using the 0.4mm ( AWG #26 ) wire.
For a doublet or other antenna operating at a high SWR, the 300 ohm TV twinlead may be a good choice, although it is not as readily available as it used to be (and tends to be more of an American product).
Don’t make the mistake of restricting your antenna height out of concern for feedline losses, however.
Other small coax / feedline types:
- RG-316
- RG-178 50 ohm
- RG-179 75 ohm
- LMR-100 (low-loss RG-174, not in the table yet)
- Belden 9221 75 ohm
- various types of 300 ohm twinlead
- twisted pair from CAT-5 cable (100 ohm)
- Belden 89907 “Thin Ethernet” (larger than RG-174, but smaller than RG-58 coax)
Another way to save weight with a doublet is to use an open wire line with a minimum of spacers. One way to do this is to use a relatively wide gap at the feedpoint, perhaps 1m (3 feet), with a piece of rope for a center insulator. The feedline wires (which can be extensions of the antenna wires) run from there down to the tuner: the wide spacing at the top helps to keep them from twisting together. (A spreader at the bottom, which can be shorter, will help also.) That places some limitations on the antenna height and location relative to the operating position in order to keep proper tension on the line, but can give lower losses and less weight. The antenna should still work even if the wires are twisted in places, though it will change the tuner settings.
At one point I built a doublet with a movable center insulator, allowing me to shift wire between the antenna and the feedline as desired. Seemed like a good idea, but I don’t remember if I ever actually tried it out… another page to add when I find it…
Connectors
One way to save weight is not to use connectors, at least not at the antenna feedpoint. My dipole kits are generally built with the center insulator connected directly to the coax, while allowing the connection of different wires to it. The weight savings also helps when your support is not very strong.
The standard PL-259 coax connector weighs 35 grams ( 1.25 ounces ), which is significant compared to the rest of the antenna when light wire and feedline are used. By comparison, a BNC plug only weights 14 grams ( 0.5 ounces ). Obviously, the connector needs to fit your rig: I started backpacking with a Heathkit HW-8 and a Ten-Tec Argonaut 505, both of which used phono (or “RCA”) plugs designed for audio use, which actually work pretty well. They are very light, only 1 gram ( 0.04 ounces), and, if stepped on and bent, are easier to repair in the field than a BNC. (This weight comparison ignores the weights of the corresponding sockets.)
If you are building your own transceiver for backpacking, or for balanced line, you can use any sort of small 2-pin plug.
Options with Minimum feedline
There are several good options for antennas that don’t need a feedline. Unfortunately, I’ve also seen hams attempt to avoid feedline losses by using methods that actually result in higher losses / worse performance. Depending on the application, height above ground often improves performance by more than the loss in the feedline required to elevate the antenna, but this may not be the case for NVIS paths.
Perhaps the most common method is to use an end-fed wire connected directly to the transmitter, or to an antenna tuner. This is subject to the same requirements for a ground system as in any other application for verticals and/or end-fed wires. Performance may be acceptable for wires close to a multiple of 1/2 wavelength without any additional radials, but methods for home operation that rely on the coax cables and AC power connections for the “ground system” often don’t work as well with a small self-contained transmitter.

Putting the transmitter in the center of a horizontal dipole doesn’t work well when operating from ground level (except for NVIS paths) because of the low height. It may work, however, if operating from an elevated deck, mountain top, tree, or fire lookout tower.
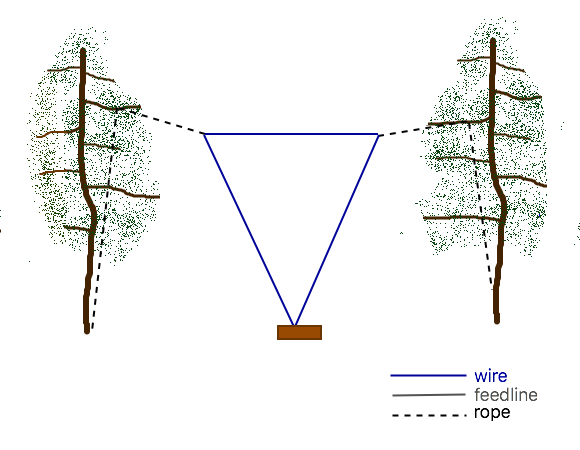
Using a vertical full wave loop has a number of possibilities. Generally, vertical loops will require less feedline length for the same top height. We can adjust the shape of the loop to vary the feedpoint impedance to a convenient value: for 50 ohms, for example, a 40m delta loop (with the flat wire at the top and the point down) would be about 18 m ( 60 feet ) high and 10.5 m ( 35 feet ) wide at the top. For 20m, the lengths are 10 m ( 33 feet) high and 5.2 m ( 17 feet ) wide. Other than the narrower SWR bandwidth, such a loop will work nearly as well as a dipole at the same height, and can be strung between two trees where there is not enough space for a dipole. a wider, lower loop can be used if the rig will match the higher feedpoint impedance.
Antenna Supports
Masts
As most of my backpacking has been in areas with trees, I haven’t needed to carry a mast with me (although at times I have had to improvise a portable antenna support using my walking stick, fences, sign posts, rock outcrops, piles of gravel, etc.). But there are other areas where trees aren’t always in the desired operating locations, such as grasslands, deserts, above timberline, or parking lots, where one may need to bring along a support mast of some sort.
In choosing a mast, we need to consider the overall height and how that will improve our signal, as well as how much it will weigh. Also, the minimum length determines how easy it is to carry. For reference, my pack frame is about 79 cm (31 inches) tall, so anything more than that needs to stick out the top. Let’s consider some examples.
| mast type | minimum length cm (inches) | height meters (feet) | weight grams ( ounces) | grams / meter (ounces / foot) |
| telescoping fishing pole | 107 ( 42 ) | 6.1 ( 20 ) | 454 ( 16 ) | 75 ( 0.8 ) |
| telescoping MFJ-1910 | 116 ( 45 ) | 10 ( 33 ) | 1475 ( 52 ) | 147 ( 1.6 ) |
| aluminum tent poles 19mm (3/4 inch) | 71 ( 28 ) | 5.5 ( 18 ) | 980 ( 32 ) | 178 ( 1.8 ) |
| steel tent poles 19mm (3/4 inch) | 71 ( 28 ) | 5.5 ( 18 ) | 1400 ( 50 ) | 254 ( 2.8 ) |
| aluminum tubing 15mm ( 19/32 inch ) | 41 ( 16 ) | 6.1 ( 20 ) | 588 ( 21 ) | 96 ( 1.1 ) |
| telescoping handle for dusting | 145 ( 57 ) | 4.9 ( 16 ) | 1000 ( 35 ) | 204 ( 2.2 ) |
The first two examples are telescoping fiberglass fishing rods, a common choice for portable supports. These are available in many sizes up to 25m (85 feet) tall, although most likely we will be using shorter ones for backpacking. I have measured ones that I have on hand as representative samples. One problem with these is that the top section is very flexible, and will only hold a light wire for a vertical or possibly a loop. Dipoles and many other antennas need to be supported at the top of the next section. They can, however, be disassembled, and only a subset of the sections used when the full height isn’t needed.
The next two are standard sectional metal tent poles, though not as common now as they were 20 to 40 years ago. The sections come in various lengths with swagged ends (meaning one end is compressed so it will fit inside the next section). These also can be used as vertical antennas, and with enough sections can be up to a quarter wave on 40m. The values for aluminum and steel may give a sense of the weight difference between materials for some other sorts of masts.
The 5th entry are some shorter pieces of aluminum tubing with a relatively thin wall, connected by lengths of plastic tubing that provides a snug fit. This probably about the lightest aluminum mast: while the plastic joints give it a bit more flexibility, it is still adequate at this height with guys. It is more bulky than a telescoping mast since the parts don’t nest, but the minimum length is much smaller. I don’t know what these were originally designed for, as I found them in scrap, but this may be typical of what can be done using thinnest available aluminum tubing.
The last entry is a telescoping handle for dusting high ceilings, and is typical of some of the other types of handles commercially available (although sometimes you may have to buy the attachment that comes with it to get the desired handle). While this is rather too long to attach to a backpack (at least on trails with overhanging tree branches), it might double as a walking stick.
Kites
When local circumstances and weather are favorable, a kite probably provides the best ratio of height to weight, especially for end-fed wires. A parafoil kite is made entirely of cloth, with no sticks, so is easier to transport in a backpack.
Rope
Rope generally doesn’t add as much weight to an antenna kit as feedline or wire, but the size should be appropriate to the wire being used. Hams who are used to installing antennas using 2-3mm ( AWG #8 to #14 ) wire may be surprised how little tension is required on the end of a backpack dipole, and how small of a rope can be used. In practice, the lower practical limit is where you are comfortable tying (and, especially, untying) knots. While in the past I have used braided fishing line around 0.5mm ( 0.02 inch), and even dental floss, I find as my eyes get older that anything smaller than about 1mm ( 0.04 inch ) isn’t comfortable for me to work with on a regular basis. (That assumes I am tying “slippery” knots that are easy to untie.)
Rope / twine / string / line comes in many different styles. Perhaps the most common type found in stores in the US is “Mason’s Twine”, traditionally used to lay bricks in a straight line. Standard sizes are 1.3mm ( 0.05 inches, or “Twine Size #15” ) and 1.5mm ( 0.06 inches, or “Twine Size #18” ). Most often it is twisted nylon, although braided types are available. (Here is a link to a Twine Size Table for reference.) These weigh 1 gram per meter ( 0.01 ounce per foot) and 1.3 g/m ( 0.014 ounce per foot ) respectively, and those should be good estimates for small ropes of similar sizes. This twine is also available in bright colors for better visibility.
One of my favorite ropes for portable antennas came from a commercial fishing store in Alaska (you use whatever is available!) and is 2.2mm ( 0.085 inches, “Twine Size #36”) braided nylon, sold for use on crab pots. It is a bit heavier, at 2.4 g / m ( 0.025 ounce per foot ) but a very comfortable size, even for heavier antennas, and I am still using what remains of it 40+ years later.
While nylon or polyester give better strength, that isn’t required for tying off the ends of inverted vee dipoles, and I have found several types of lighter twisted plastic twine that work well. These tend to be a bit thicker (although it is difficult to measure the diameter of a soft rope) but have similar weights to the Mason’s Twine.
Most hams will simply use whatever materials available locally, but there are some other factors to consider. Perhaps the most important is if you plan to throw a rope over a tree to support an antenna. In my experience, the most difficult part is getting the end of the rope back down from the tree once you get it over a branch. This is often due to the friction of the rope running over the tree bark. Twisted Mason’s Twine isn’t too bad the first few times it is used, but it tends to get soft and “fluffy”, and the individual strands catch on the bark. Braided twine works much better, and especially those with smooth finish, and not too soft. Of course, this also depends on the type of tree: pine and oak bark have much more friction than eucalyptus. But I’ve learned to carry at least a 15m (50 foot) length of braided line that is only used for throwing, and which can then be used to pull up other types of rope as needed. The types of twine made by twisting a long strips of flat plastic will show more wear with use if they are pulled over branches with rough bark, but they should still survive several trips.
When throwing ropes over trees, I tend to look for a rock about the size and shape of my fist, since I don’t want to carry a throwing weight with me. The rock has to have enough weight to pull the end of the rope back down to the ground. If possible, find several suitable rocks, as some may come loose in the process. In one case in Tasmania (VK7), I found a great place to eat lunch and hang a vertical dipole over the ocean, but it was all sand and there were no rocks of any size. However, I found an old sock, which I filled with sand instead. A plastic water bottle can also be pressed into service.
Projects and Related articles
Portable dipole kit for backpacking
Shortened 20m / 80m dipole element
adventures with small feedlines
Winding Wires and Ropes so they don’t tangle
Adjustable length doublet
Unconventional link dipole for 20/30/40m
2m antennas for a backpack
Roll-up J-poles
lightweight 2m yagi ideas
Matching an end-fed half-wave wire